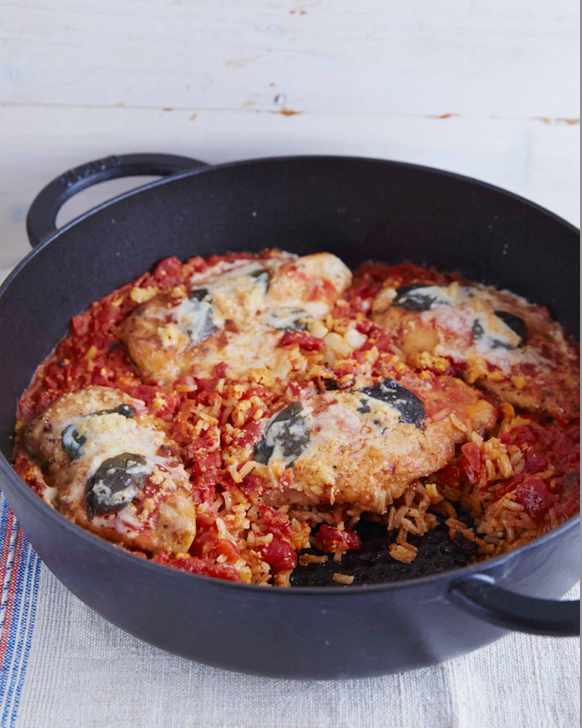
Photo by John Kernick Used with permission.
Please note that the recipes to Silvana’s gluten free all-purpose flour blend and her dairy-free Parmesan (two ingredients used in the recipe) are located below the chicken parm recipe. Keep scrolling for more delicious goodness 😀
One-Pot Chicken Parm Rice
Serves: 4
Prep Time: 8 minutes
Cook Time: 48 minutes
Ingredients:
2 tablespoons olive oil
3 garlic cloves, smashed
4 boneless, skinless chicken breasts, pounded skin
Salt and black pepper
1/3 My Gluten Free All-Purpose Flour
1 cup long-grain white rice, well rinsed in cold water
1 14.5 ounce can chopped tomatoes (about 1 1/2 cups)
1 cup homemade or store-bought chicken broth or water
1 8-ounce can tomato sauce (about 1 cup)
6 large fresh basil leaves, torn
1/4 cup Dairy-Free Grated Parmesan or store-bought
1 cup shredded store-bought dairy-free mozzarella for topping
Instructions:
1. In a large Dutch oven, heat the oil over medium-high heat. Add the garlic and cook until golden, about 1 minute. Meanwhile, season the chicken generously with salt and pepper and lightly dredge in the flour. Working with 2 pieces at a time, add the chicken to the Dutch oven and cook, turning once, until browned, about 4 minutes total. Transfer to a platter.
2. Add the rice to the Dutch oven and stir to coat, about 2 minutes. Add the tomatoes, broth, and 2 teaspoons salt. Bring to a boil. Top with the chicken, tomato sauce, basil, Parmesan and mozzarella. Cover, reduce the heat to low and gently simmer until the chicken and rice are cooked. 30-40 minutes. Serve hot.
Silvana’s Gluten Free All-Purpose Flour
Makes: about 10 cups
Prep Time: 12 minutes
Ingredients:
6 cups (870 g) white rice flour
3 cups (375 g) tapioca flour,
preferably Shiloh Farms
1 1/2 cups (246 g) potato starch
1 tablespoon salt
2 tablespoons xanthan gum
Instructions:
In a large bowl, whisk together all of the ingredients. Transfer to an airtight storage container. (The flour keeps in a cool, dry place or refrigerated for up to 6 months.)
Dairy-Free Grated Parmesan
Makes: About 1 cup
Prep Time: 1 minute
Ingredients:
3/4 cup macadamia nuts
1/4 cup nutritional yeast
1/2 teaspoon salt
Instructions:
Using a food processor, pulse together the macadamia nuts, nutritional yeast and salt. Refrigerate. (The Parmesan will keep in a resealable container for up to 1 week.)